
Basement Renovations in Toronto: The Ultimate Homeowner's Guide

In Toronto, basement renovations are one of the smartest ways to gain usable square footage without changing your home’s footprint. Whether you're adding a guest suite, home office, or rental unit, finishing your basement can increase both comfort and property value. But it’s not as simple as slapping up some drywall. This guide will walk you through what’s involved—from planning and permits to construction steps and costs.
This guide is aimed at century old homes with basements that have never been finished or have been poorly finished and have low ceilings. As with all of our work, we also assume a high quality level of finish throughout.
Is Your Basement Ready for Renovation?
Before you dream up your perfect basement layout, make sure your space is ready for transformation.
Moisture Issues: Check for dampness, standing water, or mold. If there’s any sign of moisture intrusion, it will need to be addressed. This might mean installing a sump pump, sealing cracks, or adding exterior or interior waterproofing.
Structural Soundness: Look at the foundation walls and floors. Any major cracks or bowing should be inspected by a structural engineer.
Code Compliance: Most municipalities have minimum ceiling height requirements and egress rules (especially if you plan to add a bedroom).
Permits: Nearly every basement renovation requires a permit. This ensures electrical, plumbing, and structural work is up to code and safe.
Planning Your Basement Renovation
Start with a clear vision and engage professionals early.
Purpose: Decide how you want to use the space. Each use has unique layout and code considerations (home gym, guest room, rental suite). Make your 'Needs-Wants-Dreams' list of all the features you might want in your new space (watch our short video below on how to do this).
Layout & Design: Sketch out zones—living area, bedroom, bathroom, storage. Don’t forget to consider natural light, existing support beams, and HVAC pathways.
Hire a designer or architect: A good designer or architect can help maximize space and ensure code compliance. While it may seem straightforward to layout the space yourself, someone still needs to produce permit drawings. Additionally, experienced designers and architects will help find the best solutions for your space and will allow the construction to be executed much faster than if a contractor is just making it up as they go along.
Work With a Contractor Early: As always, we highly recommend working with a contractor from the very beginning to help guide the preconstruction work by providing constructability and cost feedback.
The Step-by-Step Basement Renovation Process
1. Waterproofing and Structural Fixes
Assuming that your ceilings are currently lower than you would like, underpinning is the go-to solution to providing a taller and more welcoming space. While expensive, the process of underpinning and lowering the basement provides the perfect opportunity to address existing and future moisture problems.
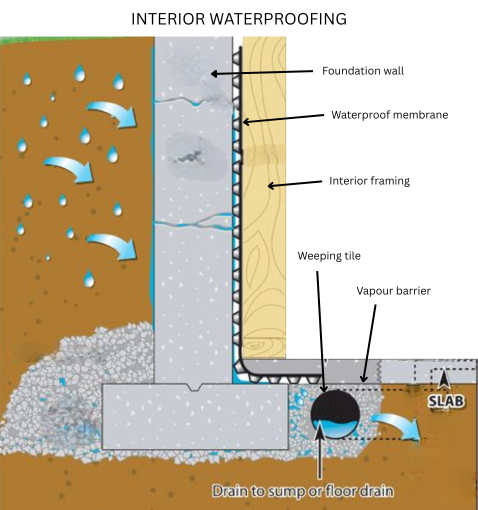
By lowering the foundation, we also need to remove the concrete slab and this gives us the chance to install waterproofing membranes both on the walls and under the slab. Even if you don't have bulk water accumulating now, there could be a high water table just under the slab and future heavy rains could put enormous strain on your slab.
A drainage mat is installed against all exterior walls ensuring that water which makes it through the foundation will then fall down to the footing.
Weeping tile (perforated pipe) is installed around the perimeter of the foundation footing which acts to collect all bulk water that has entered through the foundation walls or up through the soil below the slab. The weeping tile ultimately leads to a sump pit.
The sump pit is a sunken basin which has a pump inside of it. As water rises and reaches a certain level, the pump turns on and ejects the water outside of the house, usually into garden beds.
Gravel, insulation and a proper vapour barrier are installed prior to pouring the new concrete slab. This ensures that your basement will always stay dry.
2. Plumbing
Now that the foundation has been addressed, we turn to the plumbing.
Drains
New drains will be run since the old ones were installed at the old slab height. Oftentimes, there is enough slope in the main drain pipe that we can still connect to the city sewer by gravity alone. In the case where we have lowered the basement below the city connection (or if you don't want your nice front yard dug up), we can install a sewage ejector pump. Most people cringe at this idea, thinking that it will fail, resulting in sewage throughout their basement. In all our years of renovating homes, we have not had a sewage ejector pump fail. These are sealed basins with very robust pumps that can be paired with battery backups and alarms in the case of a power outage.
Backwater valve
In addition to the new drains, we also install backwater valves, which are not only required by the city of Toronto but are essential in ensuring that a backup in the city's sewer system does not find its way into your home.
Water supply
Underpinning a basement is the perfect time to upgrade your home's water supply. Many Toronto homes still have 1/2" supply pipes, which, regardless of the pressure, don't provide as much volume as many modern fixtures demand. Since everything is open and the plumbing is being redone, upgrading is a relatively small extra cost.
Waterline upgrade to ¾” approximately $4-5k.
3. Framing
Now that the drains are installed and the slab has been poured, we’re ready to frame the walls. Since the foundation walls have been waterproofed, we don’t need to worry about using wood studs, which are still the preferred material for residential framing.
There are a few areas where framing can extend beyond what’s obvious:
Old posts or columns that need to be removed will need to be replaced with larger beams inserted into the floor above
Stairs typically have to be widened to meet building code now that the space has been fully renovated. This involves altering the framing and stair opening in the main floor platform.
4. Electrical
When we lower basement floors, we also need to lower the electrical panel to meet electrical code. This is an opportune time to upgrade the electrical service coming into the home.
Service upgrade (from 100 amp to 200 amp)- approximately $4-5k
All new wiring throughout the basement, including new lighting
5. HVAC and Ventilation
Depending on your existing heating system, alterations may be easier or harder
Forced-air systems will have ductwork that can’t really be reduced. No matter how you slice it, you’ll have ceiling bulkheads to contend with. But we often can move those main trunks from running down the middle of the basement over to one side, making them less of an eyesore.
If you have radiant heat throughout the house (hot water radiators) then moving these pipes in the basement is fairly easy. Where they extend up through the floor can’t change, but these are much easier to hide than ducts.
With this system, it’s almost a no-brainer to install in-floor radiant heating in the concrete slab.
While many renovations of above-ground floors require mechanical ventilation in the form of an HRV or ERV, basements usually do not dictate this. Unless your basement is part of a larger home renovation, it’s best to rely on a bathroom and/or laundry room fan to exhaust stale air.

6. Insulation
There are lots of products available for insulating homes - rigid foam, mineral wool, fiberglass, and spray foa,m to name a few. Given the risk of moisture in Toronto basements, we tend to stick with spray foam for several reasons:
At 2” thick and beyond closed-cell polyurethane foam creates a vapour barrier which will prevent moist indoor air from condensing on the colder foundation wall.
Its ability to fill voids is especially useful for insulating the joist headers (the pockets formed in between the floor joists above where they sit on the foundation wall. These areas are notorious for heat loss.)
Spray foam is naturally hydrophobic, meaning it will never degrade or play host to mold.
One other area of insulation to consider is sound insulation. If you have any plans whatsoever to turn the basement into a legal rental suite, you will be required to install sound insulation in the floor joist cavities. Even if you don’t rent it out, this sound insulation can help reduce unwanted noise from a basement rec room or guest suite.

7. Drywall
Since we have taken great steps to ensure your basement is dry, there isn’t really a need to install water-resistant drywall. It won’t hurt of course but it will cost you more. The one place where we always install this type of drywall is in bathrooms.
Following on the comment above about rental suites: the main concern is fire separation and this can significant;y drive up the drywall costs. There is special drywall used to limit the spread of fire and extra details and care that goes into the installation of the drywall. Trying to retrofit these drywall details down the road to make your basement a legal rental unit will be very difficult and expensive.
Use mold-resistant drywall, especially in bathrooms.
Flooring options: vinyl plank (durable and waterproof), tile (great for moisture), or carpet with moisture barriers.
Ceilings: Drop ceilings allow easy access; drywall offers a cleaner look.
8. Final Touches
Once again, the waterproofing measures we’ve taken now allow you to finish your basement as if it were an above-ground space. We often install engineered hardwood flooring but for those who are still wary of the worst case scenario, there are lots of water-resistant flooring options. Luxury vinyl flooring has come a long way and now produces faux wood planks that really look like the real thing. Since you now have a new concrete slab, you could also consider polishing it which is a striking look.
What Does the Average Basement Reno in Toronto Cost?
Here’s a rough breakdown for a 600-square-foot basement:
Underpinning (incl. Waterproofing and slab): Approximately $720/lineal foot. $72,000 - $84,000 for the average Toronto basement
Framing: $18,000 - $36,000
HVAC, Electrical & Plumbing: $48,000 - $72,000
Insulation & Drywall: $19,000 - $36,000
Finishing: $48,000 - $72,000
Design & Permits: $7,000 - $14,000
Total Estimated Cost: $200,000 - $300,000+
Luxury upgrades (e.g., custom cabinetry, full kitchen, high-end baths, built-ins) can push costs much higher.
What are the Common Pitfalls to Avoid?
Skipping Waterproofing: Moisture will ruin your investment if ignored.
Underestimating Costs: Always add a 10-20% buffer for surprises.
Not planning for future rental: If you have even the remotest idea that you will rent the basement as a separate suite in the future, you should plan for it now. Retrofitting fire separations is a nightmare.
Ignoring Permits: You could face fines, failed inspections, or insurance issues.
Tips for a Successful Basement Renovation:
Vet Contractors Thoroughly: Ask for references, licenses, insurance, and past project photos.
Timeline Realism: Most full basement renovations take 3-5 months.
Expect the Unexpected: Hidden problems can derail progress.
Don’t skimp on design: Even though it’s a basement, a well-designed plan will greatly aid the construction process.
Conclusion
A finished basement can transform your home and increase its value, but only if done right. Understand the process, respect the building codes, and bring in help where needed. With smart planning and a realistic budget, you can turn that unused space into one of your home’s best features.
Ready to transform your basement? Contact Lighthaus Built, Toronto’s experts in luxury home and basement renovations. Book your consultation today.

Meet the Author

Dave Cook is co-owner of Lighthaus Built and has spent 17 years working in single-family construction in Toronto. Through the years, he has worked as a carpenter, site supervisor, and project manager for more than 60+ major, high-end renovations and custom homes.
As an HCRA-licensed builder, he and his company (Lighthaus Built) are well-versed in constructing high-quality homes and take pride in what they do.
On a personal level, Dave is very active in several sports - most notably, distance running, road cycling, and tennis. He bakes bread (for personal consumption) and no, this was not a Covid thing. He grew up eating homemade bread and has made my own for the past 20 years. He has been married for 20 years and has two teenage children and a dog.

Lighthaus Built’s
FREE Toronto Renovation Cost Guide
Are you considering a home addition or full home renovation and not sure how to budget for it?
Our free guide walks you through over 50 topics and how the cost of materials, labour and design ranges so you can plan for your Design-Build home renovation in Toronto.